I once wanted a way to securely write my personal Web site from my Linux laptop while using a public WiFi. The problem was that the site was not yet hosted and my development environment and site’s files were on my home desktop Linux PC. So, in order to use my home PC’s desktop remotely and securely, I implemented a solution to the following requirements.
Note: The terminal commands in these instructions are written for Linux systems, but the concepts are compatible with Windows and MacOS, and the tools are available for these OSs as well. These versions of the required tools (Putty and VNC server and client) as well as the router configuration will have the same configurations as the shown in these instructions, and of course, the tools are available for all three platforms.
Note: These instruction’s methods and tools will also allow you to setup an encrypted remote desktop session between all combinations of PCs and in both directions. Linux-to-Windows, Windows-to-Linux, MacOS-to-Windows, etc.
Requirement 1: Set-up VNC (Virtual Network Computing) to run over SSH.
The reason why I wanted to use SSH was to make sure my data was encrypted, including my VNC username and password. After all, these are sent as clear-text (unencrypted) when not over SSH. So, any malicious hacker could get them with a traffic sniffer.
Requirement 2: Set-up port-forwarding on my local wireless router.
I wanted to use the port of my choosing when connecting over the Internet. If I didn’t do this and I just kept the default SSH port (22), two things could happen. First, the firewall at my remote location (eg. public wifi, coffee shop, etc) could be blocking that port. Second, there could theoretically be hackers either coming from the LAN or WAN side who might scan the network and then try connecting to your laptop via SSH. They would already know that port 22 is the default port for SSH and if they could discover the SSH password, then they could get in. If I picked my own port, then they may not find it because it is non-standard SSH and would decrease the odds of getting hacked.
Requirement 3: Web browser tunneling
When accessing a particular URL on my remote (laptop) PC’s browser (native. not while in VNC), I wanted to submit the request via SSH to my home PC’s HTTP port 80 and then send that HTTP data stream back to my remote PC’s browser. In this case, I wanted a way to access my WordPress site without having to go through VNC to directly view the gui of my remote PC’s browser, which slows browsing down a bit.
So, lets start…
Server (home PC) Side
Complete the following steps on the PC that you want to control remotely.
STEP 1: Install and configure SSH Server on the home PC
Type the following in the Terminal:
sudo apt-get install openssh-server
Make a backup of the SSH daemon’’s config file:
cp /etc/ssh/sshd_config /etc/ssh/sshd_config_orig
Then, open the SSH daemon configuration file and add the following line to the bottom of the file if it does not already exist. Replace with, you guessed it, the username on your home PC that you want to pipe SSH data to. The password will be the same as the one that you login to your account with, and make sure that this password is very strong because it will be used to access your PC from the Internet and through your firewall. Also, I think that the MaxStartups and MaxAuthTries are 3 by default, but set it here just in case.
AllowUsers yourHomePCusername
MaxStartups 3
MaxAuthTries 3
STEP 2: Install and configure VNC Server and XiNetD (Extended Internet Service Daemon) on the home PC
sudo apt-get install vnc4server xinetd
Then, change the xstartup file in ~/.vnc/ to be the following. This file syntax may be different than your version.
— — — ~/.vnc/xstartup — — —
#!/bin/sh
# Uncomment the following two lines for normal desktop:
unset SESSION_MANAGER
exec /etc/X11/xinit/xinitrc
[ -x /etc/vnc/xstartup ] && exec /etc/vnc/xstartup
[ -r $HOME/.Xresources ] && xrdb $HOME/.Xresources
#xsetroot -solid grey
#vncconfig -iconic &
#x-terminal-emulator -geometry 80x24+10+10 -ls -title "$VNCDESKTOP Desktop" &
#x-window-manager &
gnome-session &
Then, add executable permissions to the xinitrc file.
sudo chmod 755 /etc/X11/xinit/xinitrc
Note: The maximum number of VNC sessions is limited to the number of SSH tunnels that you have configured for VNC. In this case, it is only one, port 5901.
STEP 3: Configure port forwarding on the wireless router that is in the home-network LAN
If you don’t want to do this, but still want to use a non-standard SSH port, then just change the port number of the line that reads ‘’Port 22’’ in the SSH daemon config file /etc/ssh/sshd_config. Change it to an unused non-standard port of your choosing. I have found that port 444 is free, but keep in mind that a port that appears to be available may be used by a program on your system that hasn’t been run yet or a running program that has not yet allocated the corresponding TCP socket and port.
To see all TCP ports that are currently being used in your system, just type the following into the Terminal:
ss -t -a
Instead of changing the SSH config file to use the custom port, I add an entry in my router that converts from my custom port (let’s say 444) to the standard SSH port 22. To do this, type your router’s IP address into your browser. To get this address, just type ‘’route’’ in a Terminal and look for the line that shows ‘’default’’ as the Destination column. The Gateway column entry for this row is the IP address. Once you’re logged into your router, just go to the Port Forwarding screen. In my Linksys router, it is under the ‘’Applications & Gaming’’ tab. Add an entry and call it ‘’SSH Tunnel’’ or whatever else you want to call it. External port is 444 and Internal Port is 22, and ‘’To IP Address’’ is set to the IP address of your home PC server where you have the SSH Server daemon running. Make sure to enable the entry and then save the changes.
STEP 4: Block SSH port 22 and all default VNC ports in the wireless home router
You should block SSH port 22 and especially all default VNC ports (5900 to 59xx) on your router, as we want to remove the risk of the unencrypted VNC data ever getting through your firewall should you misconfigure it now or in the future. Also, if they are not already, you should also block all default ports for Telnet(23), FTP(21), TFTP(69), and SNMP(161, 162) as well as SMTP(25, 2525, and 587) if you want to block ping requests. Just make sure that your custom SSH port (444) is not blocked.
STEP 5: Start the SSH and VNC server applications on the home PC
Start SSH server
service ssh start
…or…
sudo /etc/init.d/ssh
Start VNC server using display on port 5901
vncserver :1
If you want to stop the SSH server:
service ssh stop
…or…
sudo /etc/init.d/ssh stop
If you want to close the VNC server port 5901:
vncserver -kill :1
Remote (laptop) Side
Do the following steps on the PC that you will use in a remote location.
STEP 1: Install SSH and VNC clients
For SSH, I like to use Putty which is a graphical client that handles many protocols, including SSH. Let’s install that.
sudo apt-get install putty
Ubuntu has a built-in VNC viewer called Remote Desktop Viewer. I tried that one, but found it was too slow. I prefer to use xvnc4viewer.
sudo apt-get install xvnc4viewer
STEP 2: Configure SSH connectivity and tunnels, and then connect.
Let’s open Putty and create a new session. Just type ‘putty’ in the Terminal.
The “Session” category on the left column should be selected. At the top, there is a field that states ‘’Specify the destination…etc.’’ Type in the WAN-side IP address from your router.
To get this, login to your wireless router on your home PC LAN and go to the Status screen. If you are connected to the Internet, then you should see an entry called ‘’Internet IP address’’ or something similar. Perhaps ‘’WAN IP address’’ or ‘’External IP address’’. Type this into the field in Putty. Then, type ‘’444’’ in the port field. That is the custom port that SSH will talk to from the Internet. Now, save your configuration. Type ‘’SSH tunnel for VNC’’ into the Saved Sessions field box and then click Save. Note: whenever you want to save any configuration change from any category within Putty, you have to come back to this screen and save it here.
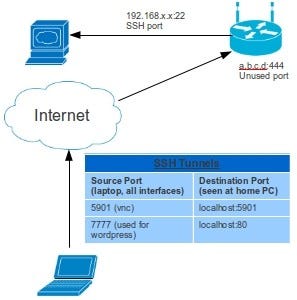
Next, select the SSH/Tunnels category, then create a new tunnel with a Source Port of 5901 and a destination of ‘’localhost:5901’’. Select the Local radio button under Destination. Click Add. Adding this tunnel satisfied Requirement #2 as stated previously. To satisfy Requirement #3, we need to add another tunnel with a Source Port of some arbitrary non-standard unused port of your choosing. Let’s use 7777. So, enter that port into the Source Port field and then enter localhost:80 as the destination. Again, the Local radio button is selected. Click Add again, and then go back and save the configuration. Then, to connect, click the ‘’Open’’ button at the bottom.
At this point, a Terminal should pop up asking for the username and password of the SSH session. The command line prompt should be your home PCs’. If it is the prompt from another PC on your network, most likely from your laptop, then you have another ssh server application running and you need to stop it. Anyway, once you are logged-in via SSH, then your tunnels are also connected.
Note: If you do not want to use Putty, then you can just type the following in the Terminal to create the SSH tunnel for only the VNC port 5901. a.b.c.d is your WAN Internet IP address as described above.
ssh -L 5901:localhost:5901 a.b.c.d -p 444
STEP 3: Start VNC client
vncviewer localhost::5901
Hopefully, you should be up and running now. VncViewer will now show your home PC’s desktop from your remote PC, and the corresponding data stream between the two PCs will be encrypted.